You can create your own certificates that are specific to your business and are not nationally recognised. These can include but are not limited to VOCs, Inductions, in-house training, and medicals.
Log in to MyPass and go to Certifications.
Click the + icon.

Input and complete the required information such as the following:
- Code - is the qualification code, if there's no indicated code use the certificate name initials instead.
- Name - the certificate name as indicated on the document.
- Description (optional) - any description you want to add or specify.
- Issue Date - the date of attainment. Click Mandatory if the Issue Date is mandatory and should be entered when verifying the attainment. Select Optional if not necessary OR Disabled if not needed.
- Expiry Date - add this if the attainment has a validity period. Click Mandatory if the Expiry Date is mandatory and should be entered when verifying the attainment. This enables the Default Expiry Period field. Select Optional if not necessary OR Disabled if not needed.
- Allow Custom Validity Period - will allow you to set validity periods and calculate expiry periods of your certifications. Select False if not needed OR True if you expect to be set.
- Reference - is usually the document number. Click Mandatory if a reference is available on the document, is mandatory and should be entered when verifying the attainment. Select Optional if not necessary OR Disabled if not needed.
- Contains date of birth - tick this if the document contains a date of birth.
Once the above fields are completed, click Next.

Continue completing the rest of the fields such as the following:
- Country - click to view selections. Choose the country where the Certification originated or was obtained.
- Certificate Type - select Medical if the attainment is a medical type and VOC if it is a Verification of Competency. If neither, leave blank.
Tick the following where necessary:
- Sensitive Certificate - prevents users from accessing the Certification file unless User Permissions are granted.
- External Certificate - a certificate which is linked to an external Learning Management System (LMS) course that requires both booking and attainment via an integration.
- Prevent certification uploads - removes the ability for any users to upload documentation against this certification.
- Do not display certificate documents - users can only see minimal attainment information. Attachments are not available.
- QuickVerify - selected user groups can immediately verify this certificate when adding it to Personnel. For more details, go to QuickVerify Internal Certificates.
Once completed, click Add Certification.
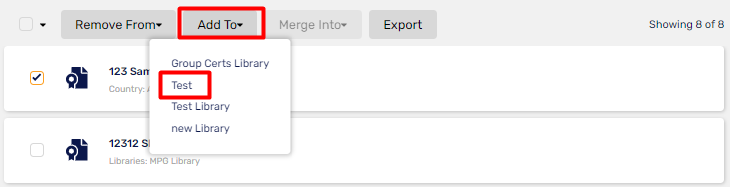
Go to your newly added certificate and tick the box next to it to add it to a library. If you don’t have one yet, go to Libraries for instructions.

Click the Add to button and select the library where you want the certificate to be added
View and delete your own certificate
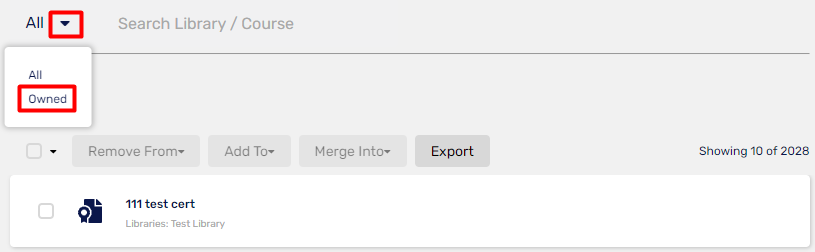
To view the certificates that you own, click the dropdown menu next to the search bar and select Owned.
Note: The All selection will display all certificates, including certificates from shared libraries.
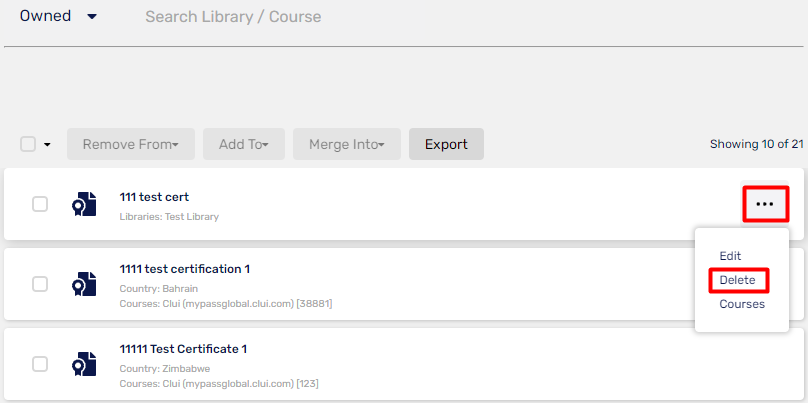
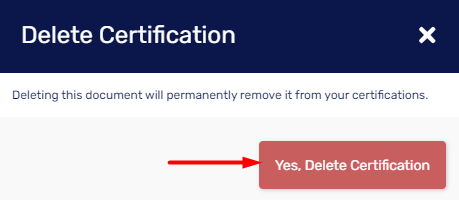
You can delete certificates that you created/own as long as they are not being used. Click on the ellipsis icon and select Delete.
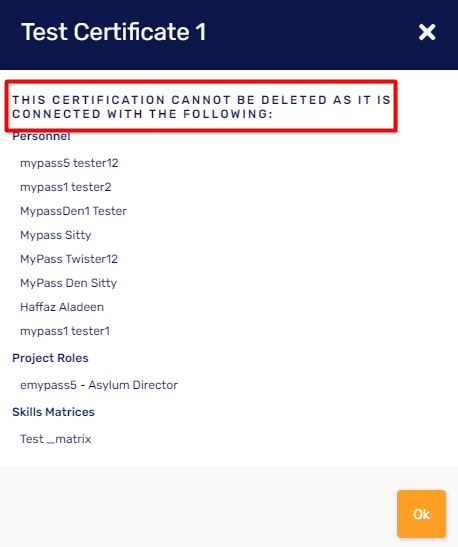
If a certificate is in use you will receive a warning to prevent the deletion.
If it is not in use, you can proceed to delete it right away. Click Yes, Delete Certification.
Updated
Comments
0 comments
Please sign in to leave a comment.